我们在选择VPS、服务器架设项目之后,所有的项目、网站数据都需要我们自行备份和维护,即便有些服务商有提供管理型服务器,但是数据自行备份和管理才是较为靠谱的。无论是网站,还是其他项目,数据的备份方式有很多种,有服务商提供的快照备份,也可以我们手工和自动利用脚本备份到本地服务器或者远程服务器。
但是,较多的做法都只能做到定期和定时的备份,如果我们网站项目数据吞吐量比较大,那定时备份并不能完美的解决数据的容灾问题,万一数据丢失或者不完整,我们可能只能恢复到上一个备份点,也会产生数据丢失。如果我们项目比较大且数据重要,定时备份的方式肯定不行的。
我们可以在定时备份的同时,采用增量同步备份,比如主服务器数据增加一刹那,也会在备份服务器中同步过去,如果我们数据更为重要的,还可以采用多台备份服务器同步。在这篇文章中,老部落(微信公众号:imweber)重新整理一份较为完整且确实可行的Rsync同步增量备份方式。

第一、准备工作
1、数据备份
如果我们没有把握一次性搞定,我们可以准备两台测试环境服务器实现Rsync同步备份功能之后再用到生产环境。如果用到生产环境,我们可以将服务器快照备份,或者将网站、项目数据备份。
2、服务器准备
这里我们采用的是Rsync同步增量备份,所以我们需要准备主服务器、以及一台备份服务器。鉴于数据备份后的功能,我们可以直接备份到备份服务器某一个目录,或者将备份服务器安装主服务器环境,将需要备份的网站项目备份到对应的同目录中。
3、端口开放
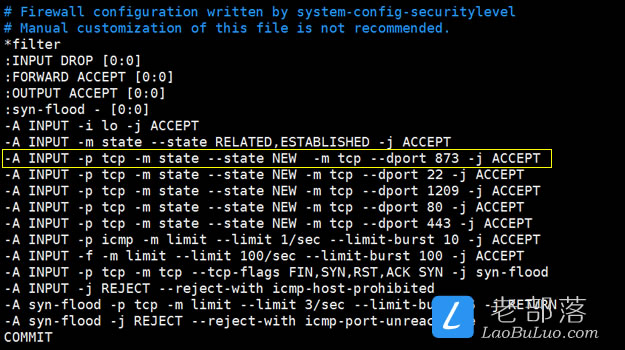
如果我们服务器没有设定iptables防火墙规则,那就不要设置端口。如果我们有设置iptables防火墙,那就需要将873端口添加放行。
vi /etc/sysconfig/iptables
打开iptables规则文档,添加:
-A INPUT -p tcp -m state –state NEW -m tcp –dport 873 -j ACCEPT

编辑保存之后,然后/etc/init.d/iptables restart重启才能生效。同样的方法,我们需要在主服务器和备份服务器同时设置。
第二、配置备份服务器
1、安装rsync
yum install rsync xinetd -y

2、配置文件
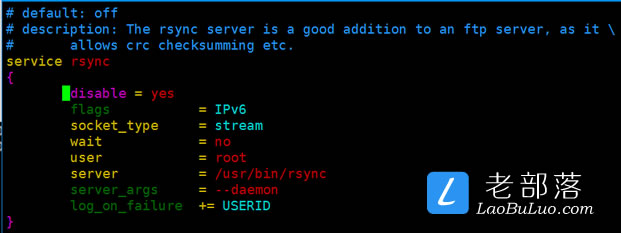
vi /etc/xinetd.d/rsync

将配置文件disable参数从”yes”换成”no”。
3、创建配置文件
vi /etc/rsyncd.conf
创建文件,然后将下面脚本添加:
log file = /var/log/rsyncd.log
pidfile = /var/run/rsyncd.pid
lock file = /var/run/rsync.lock
secrets file = /etc/rsync.pass
motd file = /etc/rsyncd.Motd
#创建一个模块名称,后面需要一致
[www.laobuluo.com]
#备份服务器目录地址
path = /home/wwwroot/www.laobuluo.com
#对应上面模块名称
comment = www.laobuluo.com
uid = root
gid = root
port = 873
use chroot = no
read only = no
list = no
max connections = 200
timeout = 600
#创建一个同步用户名,随便取,反正后面出现的时候要一致
auth users = www.laobuluo.com_user
#主服务器IP地址
hosts allow = xxx.xxx.xxx.xxx
根据我们网站项目以及服务器实际信息创建文件贴到配置文件中保存退出。
4、创建密码配对文件
vi /etc/rsync.pass
创建密码配对文件:
www.laobuluo.com_user:1234567890passwd
红色字段需要对应上面的auth users,蓝色部分是我们创建配对的密码。后面主服务器配置的时候也需要用到密码,所以必须一致。
5、开放权限和启动
chmod 600 /etc/rsyncd.conf
chmod 600 /etc/rsync.pass
service xinetd restart

第三、配置主服务器
1、安装rsync
yum install rsync xinetd -y

2、配置文件
vi /etc/xinetd.d/rsync

将配置文件disable参数从”yes”换成”no”。
3、创建密码配对文件
vi /etc/passwd.txt
将我们上面在备份服务器中蓝色的密码丢进来,必须一致。
4、授权和启动
chmod 600 /etc/passwd.txt
service xinetd restart
第四、配置主服务器
这一步我们继续配置主服务器,需要安装和配置inotify-tools来实现同步增量备份。
1、安装环境包
yum install make gcc gcc-c++ -y

2、下载和安装inotify-tools
cd /usr/local/src
wget https://download.laobuluo.com/tools/inotify-tools-3.14.tar.gz
tar -zxvf inotify-tools-3.14.tar.gz
cd inotify-tools-3.14
./configure –prefix=/usr/local/inotify
make
make install

3、配置环境变量
echo “PATH=/usr/local/inotify/bin:$PATH” >>/etc/profile.d/inotify.sh
source /etc/profile.d/inotify.sh
echo “/usr/local/inotify/lib” >/etc/ld.so.conf.d/inotify.conf
ln -s /usr/local/inotify/include /usr/include/inotify
4、配置参数
vi /etc/sysctl.conf
添加到脚本最后:
fs.inotify.max_queued_events=99999999
fs.inotify.max_user_watches=99999999
fs.inotify.max_user_instances=65535
5、创建触发脚本
vi /usr/local/inotify/rsync.sh
创建脚本:
#!/bin/sh
#同步主服务器网站目录
srcdir=/home/wwwroot/www.laobuluo.com
#目录名称
dstdir=www.laobuluo.com
excludedir=/usr/local/inotify/exclude.list
#对应同步名称要一致
rsyncuser=www.laobuluo.com_user
rsyncpassdir=/etc/passwd.txt
#备份服务器IP地址
dstip=”xxx.xxx.xxx.xxx”
for ip in $dstip
do
rsync -avH –port=873 –progress –delete –exclude-from=$excludedir $srcdir $rsyncuser@$ip::$dstdir –password-file=$rsyncpassdir
done
/usr/local/inotify/bin/inotifywait -mrq –timefmt ‘%d/%m/%y %H:%M’ –format ‘%T %w%f%e’ -e close_write,modify,delete,create,attrib,move $srcdir | while read file
do
for ip in $dstip
do
rsync -avH –port=873 –progress –delete –exclude-from=$excludedir $srcdir $rsyncuser@$ip::$dstdir –password-file=$rsyncpassdir
echo ” ${file} was rsynced” >> /tmp/rsync.log 2>&1
done
done
修改自行的文件和目录,然后保存退出。
6、创建排除目录列表
vi /usr/local/inotify/exclude.list
创建一个排除目录,这里可以添加不同步的目录,一行一个目录。如果暂时没有可以留空,以后需要用到在添加。
7、授权和设置开机启动
chmod +x /usr/local/inotify/rsync.sh
这里我们授权。
vi /etc/rc.d/rc.local
最后一行添加:
sh /usr/local/inotify/rsync.sh &

第五、检测以及生效小结
1、检查生效
设置完毕之后,我们可以通过手工检查
sh /usr/local/inotify/rsync.sh &
在主服务器执行脚本,如果看到有目录在进度,说明完美,然后去备份服务器中可以看到已经备份到的文件目录。

2、自动生效
重启主服务器,然后就会自动生效。如果不放心我们可以在主服务器对应目录丢一个文件看看备份服务器是否有增加。
这样,我们就通过rsync实现主服务器与备份服务器之间的同步增量备份,来解决大数据吞吐的解决容灾问题。如果我们数据不大,可以采用定时和手工备份,毕竟这样一套设置下来确实比较费时间。